This article shows how to access the console of a Raspberry Pi Zero 2 W over an USB cable. No Wi-Fi, keyboard, or monitor required.
I will show this on Windows. I’ve tested this with Raspberry Pi OS based on Debian 13.
This article will change the USB data port on your Zero 2 W from host mode to gadget mode - meaning the Zero 2 W will present itself as a USB device (think: USB thumb drive) to the computer it’s connected to.
This configuration is fully reversible.
For this guide to work, your Pi needs to support USB OTG (on the go). At the time of writing, this is only supported by Raspberry Pi Zero models but not by the regular Pis (like 4 or 5).
Why would you do this?
Connecting to a Raspberry Pi directly this way is required if you accidentally messed up the network configuration on your Pi and thus can’t connect to it via SSH anymore (and you don’t have a keyboard and monitor at hand to use instead).
Also, you can use copy and paste from Windows.
My personal use case: Before changing the network configuration of my Pi, make sure I can still access the Pi even if I screw up the network configuration.
Step 1: Setup
There are two ways to do the next steps:
- If you still have (SSH) access to your Pi, you can do everything directly on the Pi.
- If you don’t have access to your Pi, you can insert the Pi’s SD card into your Windows PC.
config.txt
This file is located in the root directory of the SD card - or in /boot/firmware on the Pi itself.
Add the following line to the end of the file (in the [all] section):
dtoverlay=dwc2
The result will look like this:
...

[all]
dtoverlay=dwc2
Details
dtoverlay stands for “device tree overlay” and is the Raspberry Pi (or ARM) way of telling the Linux kernel which devices are available. (PCs use ACPI for this instead.)
The overlay dwc2 is the “dwc2 USB controller driver”.
I could not figure out which USB driver is used if the dwc2 overlay is not used. My guess is that this driver only supports USB host mode (i.e. a regular USB port on a computer) whereas you definitely need the dwc2 driver to run the USB port in gadget mode.
All available overlays can be viewed in the overlays folder on the SD card. Check the README file in this folder for details.
Note that you can have multiple dtoverlay entries and they are cumulative. For more details, see the official documentation.
cmdline.txt
This file is located in the root directory of the SD card - or in /boot/firmware on the Pi itself.
Add this directly after rootwait:
modules-load=dwc2,g_serial
The result will look something like this:
... fsck.repair=yes rootwait modules-load=dwc2,g_serial cfg80211.ieee80211_regdom=DE
Note that the whole file must be on a single line.
Enable TTY
Last, you need to enable and start the getty@ttyGS0 service on the Pi.
To do this, execute this command on the Pi:
sudo systemctl enable --now getty@ttyGS0
If you don’t have access to your Pi, edit the user-data file on the SD card and add this runcmd section:
...
runcmd:
  - systemctl enable --now getty@ttyGS0
Note that this command will only be executed on the very first boot of your Pi. If you’ve already booted your Pi, edit the meta-data file on the SD card and change the value of instance_id to something different (like rpios-image2). This way, cloud-init (which these files belong to) thinks this is your first boot.
Step 2: Connect via USB
Next, connect your Pi to your Windows machine via USB cable. Any regular micro USB cable will do.
Plug the cable into the USB data port (not the USB power port) of your Pi.
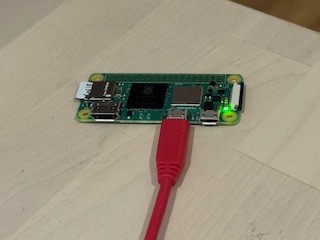 USB Cable connected to the data port
Your Raspberry Pi Zero 2 W will get its power from the data port in this case.
Step 3: Connect from Windows
Find the COM port (via PowerShell):
[System.IO.Ports.SerialPort]::GetPortNames()
We’re using PuTTY as the client:
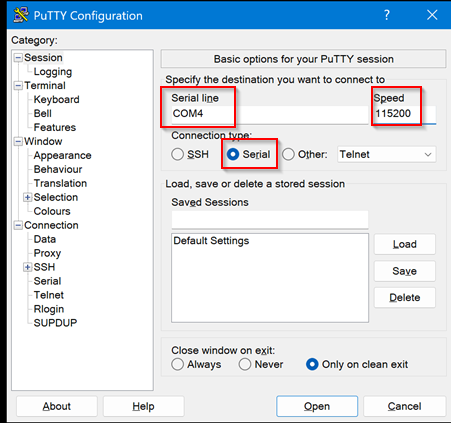 Configuring COM4 in PuTTY
You first need to switch to connection type Serial. Then enter the COM port (from above) and 115200 as speed.
That’s it.
 PuTTY connect to the Pi
The speed 115200 is the default in modern day Linux systems. On a Pi, it’s defined in /boot/firmware/cmdline.txt:
console=serial0,115200 ...
Debugging
Check if TTY service is running:
> systemctl status getty@ttyGS0
getty@ttyGS0.service - Getty on ttyGS0
   Loaded: loaded (/usr/lib/systemd/system/getty@.service; enabled; preset: enabled)
   Active: active (running) since Wed 2025-12-10 15:52:07 CET; 1min 44s ago
The service should be enabled and active.
If not, check for ttyGS0:
> ls -l /dev/ttyGS*
crw-rw---- 1 root dialout 243, 0 Dec 10 15:52 /dev/ttyGS0
This file must exist.
If not, check that the g_serial module configured properly:
> dmesg | grep g_serial
[    0.000000] Kernel command line: ...
[    0.000000] Unknown kernel command line parameters "modules-load=dwc2,g_serial", will be passed to user space.
[    2.629195]     modules-load=dwc2,g_serial
[    9.231155] g_serial gadget.0: Gadget Serial v2.4
[    9.231172] g_serial gadget.0: g_serial ready
[    9.231184] dwc2 3f980000.usb: bound driver g_serial